Showing posts with label Budget Decorating. Show all posts

Thursday, December 6, 2012

Nativity projects

I just love this time of the year.  Scratch that, I love the REAL reason for this time of the year.  Everything else is just a bonus.

I've long said I wanted to collect Nativities.  The problem is I'm super picky about which ones I like (just ask my mom when she wanted me to get one for Christmas a few years ago!).  Ever since Ashley at Make It and Love It did this in 2010 (see tutorial here)

I've been longing and planning to do it with my Silhouette machine, but I've never had a place to display it (it just needs a fireplace or something nice)  Finally I decided I'd tweak it a little bit and make it work so it can be split up.

I printed the words instead of using the Silhouette because they were just a little too skinny and were snagging in the machine.  If I did bigger than 4x6 it probably would have worked, but these were the frames I had lying around to use.  I did the shepherds and wise men in 4x6 and the manger scene in 8x10.

Wise Men Still Seek Him

 Oh, Come, Let Us Adore Him

Where meek souls will receive him, still 
The dear Christ enters in


I used my Silhouette machine to cut out the images (though you could just google nativity silhouette, there are tons of options and print it with the words).  

I really like to focus on the Savior's role in my life during Christmas and I try to make sure some of my decorations reflect that.


I love this set of hurricane candle holders that my Brother in law got me a couple years ago (Thanks, Curt!)
I think it would be pretty easy to DIY with some vinyl and hurricane jars.


While looking for my link to my inspiration at Make It and Love It, I came across this in a google search.  I really like her version as well!

How do you like to reflect the true meaning of Christmas in your home?

Tuesday, November 27, 2012

Designer Wreath Tutorial

I don't know about you, but I find those cheap wreaths a little scrawny.  But they're such a good price.  Here's how to get the look of those big fluffy wreaths for the cost of the small ones.

I picked up a 24" wreath from Michaels, but you could do dollar store or walmart has them for $4.  The tag says it's $7.99 but it was (and usually is) on sale for $5.  The smaller ones are $3 but the bigger ones are never on sale before the holidays (not that I've seen at least)


I also picked up a garland for $5 at Michaels (again, check dollar store and walmart for even cheaper options) and some holly sticks from JoAnn's at 50% off.  Because I do everything on a dime, I used twist ties, but you could use wire (I had some as back up, but this worked great!)  You'll also need something to cut wire with. 

Wrap the garland around the outside of the wreath.

Position it so it looks good from the front because we'll be working on the back for a bit. 

After carefully flipping it over begin tie it off.  Using wire or a twist tie, tie off the beginning of the garland. I used a yellow twist tie here so I could find it easily if I needed to.  Because it's at the back, you can't see it at all.  Keep the garland wrapping around the outside edge and tie off a few more places (it didn't take many)

Pull it snug so there are no gaps and tie it off until you get to the end.  Pull the end back towards the wreath frame to disguise the end.  Tie it off with another twist tie or wire.

Position the berry branches around.  I used 5 so they would overlap some.  Or use whatever you want to decorate at this point.


A few inches down from where berries split from the branch secure with wire or twist tie.

 Snip off the end of the branch.  Squeeze tight and bend the branch back and forth slightly.  Then use a small piece of the wreath to cover the twist tie.

Repeat all the away around with remaining branches.

Fluff and adjust until it looks just right. 

 I used some of the wreath's branches to bend over the holly to secure it a little bit more, but not too much.  I didn't want it flat inside the fluffy wreath.


Now hang!  I like to use fishing wire to hang mine.  It's doubled up a couple times and hung from a command hook on the other side of the door.

 Merry Christmas!

How do you like to decorate your wreaths?

Friday, November 9, 2012

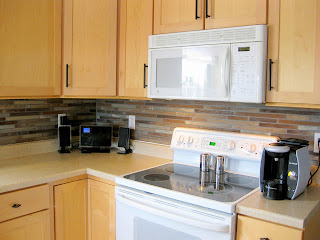
Faux Tile Backsplash for $15

I've wanted to put up some beadboard backsplash in my kitchen (in addition to doing by island) but needed something to jazz it up before we can afford beadboard.  Enter this inspiration.

It was also a good way to test to see if I like the tile backsplashes.  I love tiles (especially the goregous glass tiles they have!) but sometimes I find them too busy with granite or other stone countertops.  So I convinced myself this was a cheap way to see if we liked it with our counters :)

Even thought the beige we had would look fine as 'grout' we have builder grade flat paint.  I opted to spring for the $10 for a little can of paint so it will be more durable.  Plus a couple of tubes of craft paint (some on hand, some new) at $0.50 each.  Some painter's tape, cheap 1" foam brushes, and we're good to go.

We started with this:
 

During:


After:


It's not perfect, the paint bled a bit, but you can't tell unless you get up close.  And if you're that close to it in my kitchen, you better be making me something to eat! :)

Monday, November 5, 2012

Pendent Lights

I've had my eye on some much prettier statement pendent lights, but after seeing these for $10 at Ikea, how could I pass up?  I know it's not a good idea to waste money on something simply to just fill the void while you wait to buy the thing you really want, but for $10, I figured I could do something fun with them.  I'm thinking about painting them, or adding chevrons?  What do you think?

Before: 
(Sorry for the night photos, we did this while the kids were sleeping)

During:
Yes, that is a stool on top of the counter- we couldn't reach from the ladder that far over the
(Kids, don't try this at home)


After:

Saturday, November 3, 2012

Tall, Tall, Tall

Our house has 10-12 foot ceilings. This makes anything shorter than oh, 9 feet feel skimpy. Including the shower curtain in the kids' bath. A regular shower curtain just seemed so short! So I decided to DIY a taller one. I liked the one we'd had for a couple years and a year or so after I got it I picked up a fabric shower liner (instead of the plastic ones) that had matched it pretty well. So I picked up another one from Walmart (Target stopped carrying the shower curtain we had otherwise I would have just used another one). I cut the shower curtain and new liner into strips. I decided my strips would be about 18" but I really just looked at it and decided, not much math involved. I alternated sewing the shower curtain and liner until it was tall enough. Then I used the rest of the liner to sew onto my old shower liner to extend that as well. I made sure that my liner was about 4-6 inches shorter than the curtain so it wouldn't be sitting so low in the tub. It's so hard to capture what a dramatic difference it makes in this tiny little bathroom (with no natural light).

Before:

ugh.  Highwater shower curtain

After:

Do any of you have super tall ceilings?  I'm dreading doing curtains!

Saturday, October 27, 2012

Free (to me) Headboard

I love all the designs for DIY headboards out there.  Some are very simple.  And while there are plenty of cheap options, I needed something free.  We've never had a headboard since we've been married and I was d.o.n.e.
All I used was leftover moving boxes (yay free cardboard) and a leftover drop cloth. Obviously you can do one with wood, or a piece of foam board.  If you don't have a large piece of fabric that would also cost some money, but you can use an old sheet or something to cut costs.
After figuring out what size I wanted, I layed a bunch of cardboard pieces together.  Using spray adhesive I then added another layer (making sure seams didn't line up).  I did several layers of this until I had a pretty secure piece of cardboard.  I then covered it with my drop cloth.  Badda bing.  Free.  Sorry for no step by step pictures, I actually made this 6 months ago. It's so simple, I know you can figure it out.  Just make sure where the cardboard bends and edges don't meet up the same place every time.

To have a good tutorial (only using wood) I recommend this one, here.
To hang it I made a cardboard version of a french cleat.  I hot glued two long thin strips of cardboard (extra thick and sturdy) on top of each other.  I then rested those on screws that I screwed into the studs behind our bed.  It was sure nice to have that extra padding behind my head for all those nights of nursing in bed!